Pages

Monday, August 25, 2008

August weSTAMP Meeting

http://www.confessionsofastampingaddict.com/2008/08/august-westamp-meeting.html


Here are our swaps. The theme was 2 6x6 scrapbook pages. AMAZING creations weSTAMPERS! Most of us are more into cards than scrapbooking, so I was curious to see how everyone's twist to putting a layout together. You gals blew me away! Here are the swaps:


Ginny Schembri:


Pam Wood:


Jessica Blair:


Tara Hilde:


Linda Bickley:
Adriana Gray:
Terri Guymon:


Lorri Heiling: (I was inspired by this card HERE. I also saw a card from convention that had a sandcastle with the spiral punch for the top of it. Then MY HUSBAND actually sketched out the sandcastle for me on the right layout!! :) LOL


Recipe:
Stamp Set: Pick a Petal, Everyday Flexible Phrases

Paper: Whisper White, Bashful Blue, Pacific Point, Kraft, Tangering Tango, Kiwi Kiss
Ink: Pacific Point, Tangerine Tango, Kiwi Kiss, Summer SunAccessories: Spiral Punch, Corner Rouner, Word Window Punch, 1 1/4" Circle Punch, Dimensionals to "pop" some of the sand layers



Some little trinkets from Momento Mall. (For you out of town weSTAMPERS, sorry to spoil the surprise. Yours are in the mail and you will soon be receiving them!)
The first item in the bag is a lip balm holder. The directions can be found HERE. This is a link from Renee's SCS gallery. There is also a pen included that has the Stampin' Up logo on it. The bag topper was made with the Statement of the Heart stamp.


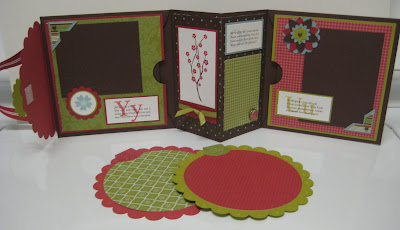
The pattern for the Carousel Notes Purse Book is from Jan Tink's blog, which can be found HERE.It folds up to look like a purse, but when you open it, there are many places to add your own creativity to! Just add some pictures, and there is also some room for journaling on here, too. The carousel notes pull out and more pictures or journaling can be added to these.


THANKS for stopping by!


Wednesday, June 4, 2008

Box in a Bag Tutorial

http://dianagibbs.typepad.com/stampin_with_di/2008/06/box-in-a-bag-tutorial.html

chocolate bag


box in a bag tutorial 001Items needed:
BG paper, cardstock in coordinating color, bone folder, sticky strip, round tab punch, slit punch, 1/4" circle punch, buttons, mini glue dots, wide grosgrain ribbon, flower stamp, and paper cutter.


box in a bag tutorial 002


Cut a piece of cardstock 4 1/2" x 4 1/2"


box in a bag tutorial 003


Score 1" around all the edges of the cardstock.


box in a bag tutorial 004


Turn cardstock on the cutter so it is in a diamond shape so you can score from point to where the other score lines met.


box in a bag tutorial 005


Hopefully this will explain what I mean better, you will score on the solid lines.


box in a bag tutorial 007


Crease your box on the 1inch score lines.


box in a bag tutorial 008


Bring the corner scores in like this.


box in a bag tutorial 009


This shows it a little better.


box in a bag tutorial 010


Using sticky strip glue your box together using the pointy folded pieces of the box. (I don't know what else to call them)


box in a bag tutorial 011


Cut your Background paper to 5 1/2" x 11".


box in a bag tutorial 012


Add sticky strip on the bottom and up one side of the back of the background paper.


box in a bag tutorial 013

Peel off the bottom sticky strip. Lay your box along the bottom of the background paper, so it is even along the bottom.  I start my background paper about half way on the side of the box so the seam will be at the back of the bag at the end.


box in a bag tutorial 014


Continue to wrap the box up with the paper, keeping the bottom edges the same.


box in a bag tutorial 015


Continue wrapping.


box in a bag tutorial 016


Pull off the side sticky strip and glue this after wrapping all the rest of the paper around the box.


box in a bag tutorial 017


After it has been wrapped and glued.


box in a bag tutorial 018


What it looks like from the top.


box in a bag tutorial 019


Now you need a strip of cardstock 11" x2", and you need your slit punch.


box in a bag tutorial 020


Using your slit punch make scallops along the strip of cardstock, I always cut it wider, so I can lay the cardstock flush in the bottom of the punch so I am assured of straight scallops on the top.
Please note: since I did this originally we now carry a Scallop punch and this works much easier


box in a bag tutorial 022
After finishing the strip, trim off about 1/4" or more off the bottom so it is a little thinner.  This is when you can add some direct to paper, or faux stitching to the scallop strip.
Add sticky strip to the bottom of the strip.


box in a bag tutorial 023


Wrap the scalloped strip around the bottom of the bag.  I start it at the back of the bag so the seam is a the back.


box in a bag tutorial 024
Bag with scallop added.


box in a bag tutorial 027


Punch out 2 round tab punches, fold in half and punch a 1/4" circle in them.  You can add direct to paper or faux stitching at this time.


box in a bag tutorial 028


Stamp three flowers with coordinating ink. I used the new ones from the Fresh Cuts set!


box in a bag tutorial 029


Cut three little strips of black cardstock, these will get threaded through the buttons.
Hey you can have faux thread that matches all our SU! cardstock!


box in a bag tutorial 031


Cardstock threaded buttons.


box in a bag tutorial 032


You will need some wide grosgrain ribbon, I used the certainly celery color as it coordinated with the background paper.
Add sticky strip to the inside of your round tab pieces.
Cut out flowers and glue dot threaded buttons to center.


box in a bag tutorial 033


Sticky strip the round tab pieces to the top of your bag.  This is what will hold the bag together when you pull your ribbon through and tie it.


box in a bag tutorial 037


Finished Bag!


Ain't it cute?  I want to thank a past upline Jeannie Waltemeyer for teaching me how to make this bag a year or so ago at one of her classes.