http://inkingidaho.blogspot.com/2008/09/start-with-piece-of-cardstock-measuring.html
http://inkingidaho.blogspot.com/2008/09/blog-post.html
http://inkingidaho.blogspot.com/2008/09/upclose-of-oval-coluzzle-template.html

Start
with a piece of cardstock measuring 10 1/4" x 5 1/4". Score lengthwise
at 3 1/2". Turn and score the short side at 3", 4 3/4", 7 3/4" and 9
1/2". Cut the sections for the bottom of the box, up to the score line,
as shown above.
 You'll need additional pieces of cardstock for the pocket, pocket flap and backpack flap.
Pocket is 3" x 2". Score at 1/4" and 1/2" on three sides. Cut corners off as shown above.
Pocket flap is 1 1/2" x 2". Score at 1/4" and 1/2" on one long side only.
Backpack flap is 2 15/16" x 2 1/2. Score at 1/2" on long side only. (Not
to confuse you, but you could cut this piece 3" x 2 1/2" if it is
easier, then cut a fraction of the edge off so it fits inside the
backpack).
http://inkingidaho.blogspot.com/2008/09/blog-post.html
This is what it looks like on the inside with the ribbons through the holes.
Attach with a little piece of Sticky Strip.
Back view
This is the back of the little pocket, nice and blurry :o), just before you attach it.
This is the finished backpack. Now you can accessorize it anyway you want! enjoy!
http://inkingidaho.blogspot.com/2008/09/upclose-of-oval-coluzzle-template.html
Upclose of the oval Coluzzle template cutting the backpack flap on the 6th line from the center. Backpack
flap needs 1/8" holes at the score line for a ribbon, about 1" from
each edge. You'll also need to punch holes on the section that you
adhesive to the backpack so the ribbons will go through both sections.

Upclose of the oval Coluzzle template cutting the pocket flap on the 4th line from the center.  Pocket should look similar to this before you put it together.
 Lay a piece of DSP over the flap and pocket tops. Add adhesive and cut around the half circle to cover.
Fold
on all score lines. Gently bend the sides in so you can close the
backpack at the top, you know, squish the tops of the sides!
Use
your 1/8" hole punch to punch 2 holes at the top, side by side in the
center about 1/2" down and 2 holes at the bottom, about 1/2" from the
edge and bottom equally.
You'll
need about 6" of ribbon for the backpack straps x2 and about 8" of the
ribbon you use for the top loop. Make sure you have enough ribbon to get
your fingers in there and tie a knot! I don't know, maybe I learned that from experience :o)


 Lay a piece of DSP over the flap and pocket tops. Add adhesive and cut around the half circle to cover.

 We water colored the flower from Pick A Petal. I love the new In Color combination of Kiwi Kiss and Tangerine Tango!
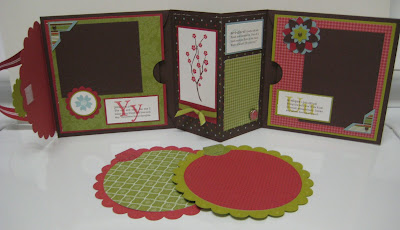
 6 x 6 double page spread. (Be sure to go HERE to see all the swaps). bly sweet!
 by Jessica Blair ...


 Here
are our swaps. The theme was 2 6x6 scrapbook pages. AMAZING creations
weSTAMPERS! Most of us are more into cards than scrapbooking, so I was
curious to see how everyone's twist to putting a layout together. You
gals blew me away! Here are the swaps:




 THANKS for stopping by!


