
Wednesday, September 24, 2008

Tuesday, September 16, 2008

Monday, September 15, 2008


Friday, September 12, 2008
Thursday, September 11, 2008
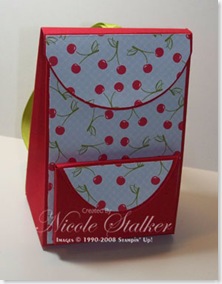
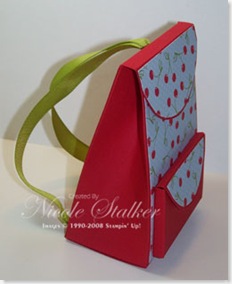
Back To School
http://thestampingrounds.typepad.com/my_weblog/2008/09/back-to-school.html

Here's how it is made:
1. I took a 7"x11" piece of cardstock, and scored it crossways at: 1/2", 3-3/4", 4-3/4", 5-3/4", 9" & 10". I then rotated it to the lengthwise direction, and scored it in at 1-1/2".

2. I cut up each of the crosslines, up 1-1/2" (to that scoreline). I then trimmed off the 1/2" tab (the first one), and cut each of the sections of two down by half (just to make it a little less bulky to work with). Now, some people would say to leave them in to add stability, so if you are adding weight to your box, be sure to do that! Lastly, I trimmed that long 1/2" scored area (the first one), but just adding a little 45 degree angle to each side - makes it easier to line up when you put the box together.

3. I used my Cropadile and punched holes where I wanted my ribbon to be. *make sure you do this before anything else! It gets harder if you wait until later - trust me, I know! (oops)* I went ahead and put my jumbo eyelets into the bottom holes only, and then threaded them with ribbon, leaving the ends hanging out (I tied a not on the backside, to keep them from coming out.)


4. I assembled the box using sticky strip. By the way - got a neat tip at convention on this - before you remove the red plastic from the tape, run your bone folder over it, and it will loosen it from the tape, making it easier to remove. Who knew?! :)
By the way, just a little note: whenever I make a box, when I put the bottom edge together, I always make sure that the flap that is attached to the FRONT SIDE goes on last - it just makes it a little nicer looking, especially when the flaps are close in size.

5. Ok, the box is almost done. Let's put it aside for a moment and take out our BigShots (don't have one? Join my new Sizzix Club, and get it and a swack of other stuff at a discount! See my CLUBS page for details!) Get out your TopNotes and Bigz Scallop Envelope dies (2 different dies). I used the Summer Picnic paper and Real Red Cardstock, and I diecut one of each, with each die. Here's the result:


*note that the envelope is best created using the 'Crease Pad' - just put the crease pad on top instead of the plastic sheet, and roll it through - you'll get better scorelines that way*
6. Ok, now you can't see it so well in the pics above (try clicking on them to make them bigger), but there is a perforated line in each of them to make them mounted, if you want. Well, we want! So, I trimmed the designer paper's perforated line, so they would mount perfectly - here are the results:
 I repeated this with the Topnote one as well. By the way, I
use Tombow only these days when mounting paper - it just works like
nobody's business, and it ain't movin' once it's stuck! :)
I repeated this with the Topnote one as well. By the way, I
use Tombow only these days when mounting paper - it just works like
nobody's business, and it ain't movin' once it's stuck! :)
7. Ok - now I marked my holes in the box, onto the lid (the top note). I punched these separately, and actually mounted my jumbo eyelets in the top note BEFORE I attached it to the box. Makes it a heck of a lot easier, and no one would notice anyway!


 And then attached it using, you guessed it, Tombow to the box.
8. I then threaded the ribbons through the holes, and tied a knot inside. Note that I pulled the ribbon ALL THE WAY OUT FIRST, and then made the knots even with each other, so I knew the straps would be even.

9. Ok, box finished, I now turned my attention to the little 'pocket' for the front. Now, some folks are making theirs a bit more 3D, and adding one more scoreline to the envelope. As I have several to do, and little time, I'm just leaving the envelope as is - consider it an option though! I used my 1/16" circle punch to punch a hole through the middle for my brad - it's easier if you do this before you fully assemble the pouch. I then put it aside, and turned my attention toward the brad itself.
Ok - I grabbed a silver brad (the new ones on page 184 - LOVE them!). I also grabbed one of my little real red craft ink spots. Here's the cute part - Ry was my 'model' for this (he took pics of me for other parts of this too, btw!) - cute, eh? Anyway, use your 'brad' as a stamp, and stamp it into the ink. Then wipe it off. Stamp it again, wipe it off - do this several times, and you will get a matching brad for your project! What more appropriate than a star for the teacher?! :)


Mount that puppy to your mini envelope, and then finish your envelope with sticky tape:
 sorry for the icky lens - that's what you get for letting your 5 year old take pics all day with it! :)
10. Ok - mount that baby to the box using sticky tape. Last but not least, make the medallion for the front! I used the scallop circle punch, the 1-3/8" circle punch, and the 1-1/4" punch. I made the apple using the 'Tart and Tangy' stampset, and I recommend Real Red Craft Ink (so the colour runs less), and a green marker of your choice.
Once your image has dried, use your crystal effects to create the 'shiny apple' look - you'll want to bite into it when you're done!! When it's dry, punch it out, mount it on dimensionals, and voila! Your teacher's gift is done!

Add in the teacher gifts (tylonal, chocolate, cute sticky notes, hershey's kisses, etc), and you have your teacher's gift! Enjoy!!


Here's how it is made:
1. I took a 7"x11" piece of cardstock, and scored it crossways at: 1/2", 3-3/4", 4-3/4", 5-3/4", 9" & 10". I then rotated it to the lengthwise direction, and scored it in at 1-1/2".
2. I cut up each of the crosslines, up 1-1/2" (to that scoreline). I then trimmed off the 1/2" tab (the first one), and cut each of the sections of two down by half (just to make it a little less bulky to work with). Now, some people would say to leave them in to add stability, so if you are adding weight to your box, be sure to do that! Lastly, I trimmed that long 1/2" scored area (the first one), but just adding a little 45 degree angle to each side - makes it easier to line up when you put the box together.
3. I used my Cropadile and punched holes where I wanted my ribbon to be. *make sure you do this before anything else! It gets harder if you wait until later - trust me, I know! (oops)* I went ahead and put my jumbo eyelets into the bottom holes only, and then threaded them with ribbon, leaving the ends hanging out (I tied a not on the backside, to keep them from coming out.)
4. I assembled the box using sticky strip. By the way - got a neat tip at convention on this - before you remove the red plastic from the tape, run your bone folder over it, and it will loosen it from the tape, making it easier to remove. Who knew?! :)
By the way, just a little note: whenever I make a box, when I put the bottom edge together, I always make sure that the flap that is attached to the FRONT SIDE goes on last - it just makes it a little nicer looking, especially when the flaps are close in size.
5. Ok, the box is almost done. Let's put it aside for a moment and take out our BigShots (don't have one? Join my new Sizzix Club, and get it and a swack of other stuff at a discount! See my CLUBS page for details!) Get out your TopNotes and Bigz Scallop Envelope dies (2 different dies). I used the Summer Picnic paper and Real Red Cardstock, and I diecut one of each, with each die. Here's the result:
*note that the envelope is best created using the 'Crease Pad' - just put the crease pad on top instead of the plastic sheet, and roll it through - you'll get better scorelines that way*
6. Ok, now you can't see it so well in the pics above (try clicking on them to make them bigger), but there is a perforated line in each of them to make them mounted, if you want. Well, we want! So, I trimmed the designer paper's perforated line, so they would mount perfectly - here are the results:
I repeated this with the Topnote one as well. By the way, I
use Tombow only these days when mounting paper - it just works like
nobody's business, and it ain't movin' once it's stuck! :)7. Ok - now I marked my holes in the box, onto the lid (the top note). I punched these separately, and actually mounted my jumbo eyelets in the top note BEFORE I attached it to the box. Makes it a heck of a lot easier, and no one would notice anyway!
And then attached it using, you guessed it, Tombow to the box. 8. I then threaded the ribbons through the holes, and tied a knot inside. Note that I pulled the ribbon ALL THE WAY OUT FIRST, and then made the knots even with each other, so I knew the straps would be even.
9. Ok, box finished, I now turned my attention to the little 'pocket' for the front. Now, some folks are making theirs a bit more 3D, and adding one more scoreline to the envelope. As I have several to do, and little time, I'm just leaving the envelope as is - consider it an option though! I used my 1/16" circle punch to punch a hole through the middle for my brad - it's easier if you do this before you fully assemble the pouch. I then put it aside, and turned my attention toward the brad itself.
Ok - I grabbed a silver brad (the new ones on page 184 - LOVE them!). I also grabbed one of my little real red craft ink spots. Here's the cute part - Ry was my 'model' for this (he took pics of me for other parts of this too, btw!) - cute, eh? Anyway, use your 'brad' as a stamp, and stamp it into the ink. Then wipe it off. Stamp it again, wipe it off - do this several times, and you will get a matching brad for your project! What more appropriate than a star for the teacher?! :)
Mount that puppy to your mini envelope, and then finish your envelope with sticky tape:
sorry for the icky lens - that's what you get for letting your 5 year old take pics all day with it! :)10. Ok - mount that baby to the box using sticky tape. Last but not least, make the medallion for the front! I used the scallop circle punch, the 1-3/8" circle punch, and the 1-1/4" punch. I made the apple using the 'Tart and Tangy' stampset, and I recommend Real Red Craft Ink (so the colour runs less), and a green marker of your choice.
Once your image has dried, use your crystal effects to create the 'shiny apple' look - you'll want to bite into it when you're done!! When it's dry, punch it out, mount it on dimensionals, and voila! Your teacher's gift is done!
Add in the teacher gifts (tylonal, chocolate, cute sticky notes, hershey's kisses, etc), and you have your teacher's gift! Enjoy!!
Tuesday, September 9, 2008
Stationery Box Video Tutorial
http://danniesdesigns.typepad.com/my_weblog/2008/09/stationery-box.html
Back in June I offered this stationery box as my class project.


It was such a hit that I decided to make a video tutorial. Normally when I post a video tutorial I also type out all of the dimensions, score lines, etc. Well, this project was so involved and has so many pieces that I decided to make a pattern for you to download.
Stationery Box Patterns.pdf
Saturday, September 6, 2008
How fun is this???
http://stampwithheather.typepad.com/stamp_with_heather/2008/09/how-fun-is-this.html


Here are the basic dimensions that I used. Not sure what else is out there for patterns as I just eyeballed this one.....
Pumpkin Pie: 8 1/2 x 7 1/2 scored at 2 inches along the bottom and the two sides (two of these are needed...these are the front and the back of the package), 3 1/2 x 5 1/2 for the flap scored at 2 inches (I used the Coluzzle to curve the flap front)
Create a tab from the bottom two 2x2 squares on the pumpkin pie cs by cutting one edge of the square off. These two pieces of Pumpkin Pie make a bag front and a bag back that assemble together. After they are attached, I creased the bag as you would for a 2x4x6x8 box. Then attach the flap from the back.
Designer Series Paper: 3 1/4 x 6 1/4 for the front and 3 1/4 x 3 1/2 for the flap. I used magnetic snaps to hold the flap down. Have fun!
Subscribe to:
Posts (Atom)